
CI/CD Pipeline for Pytest Projects
CI CD Pipeline, Jenkins, 2025
Setting Up a CI/CD Pipeline for Pytest Projects with Jenkins & Docker
Continuous Integration (CI) and Continuous Deployment (CD) help automate the process of building, testing, and deploying applications.
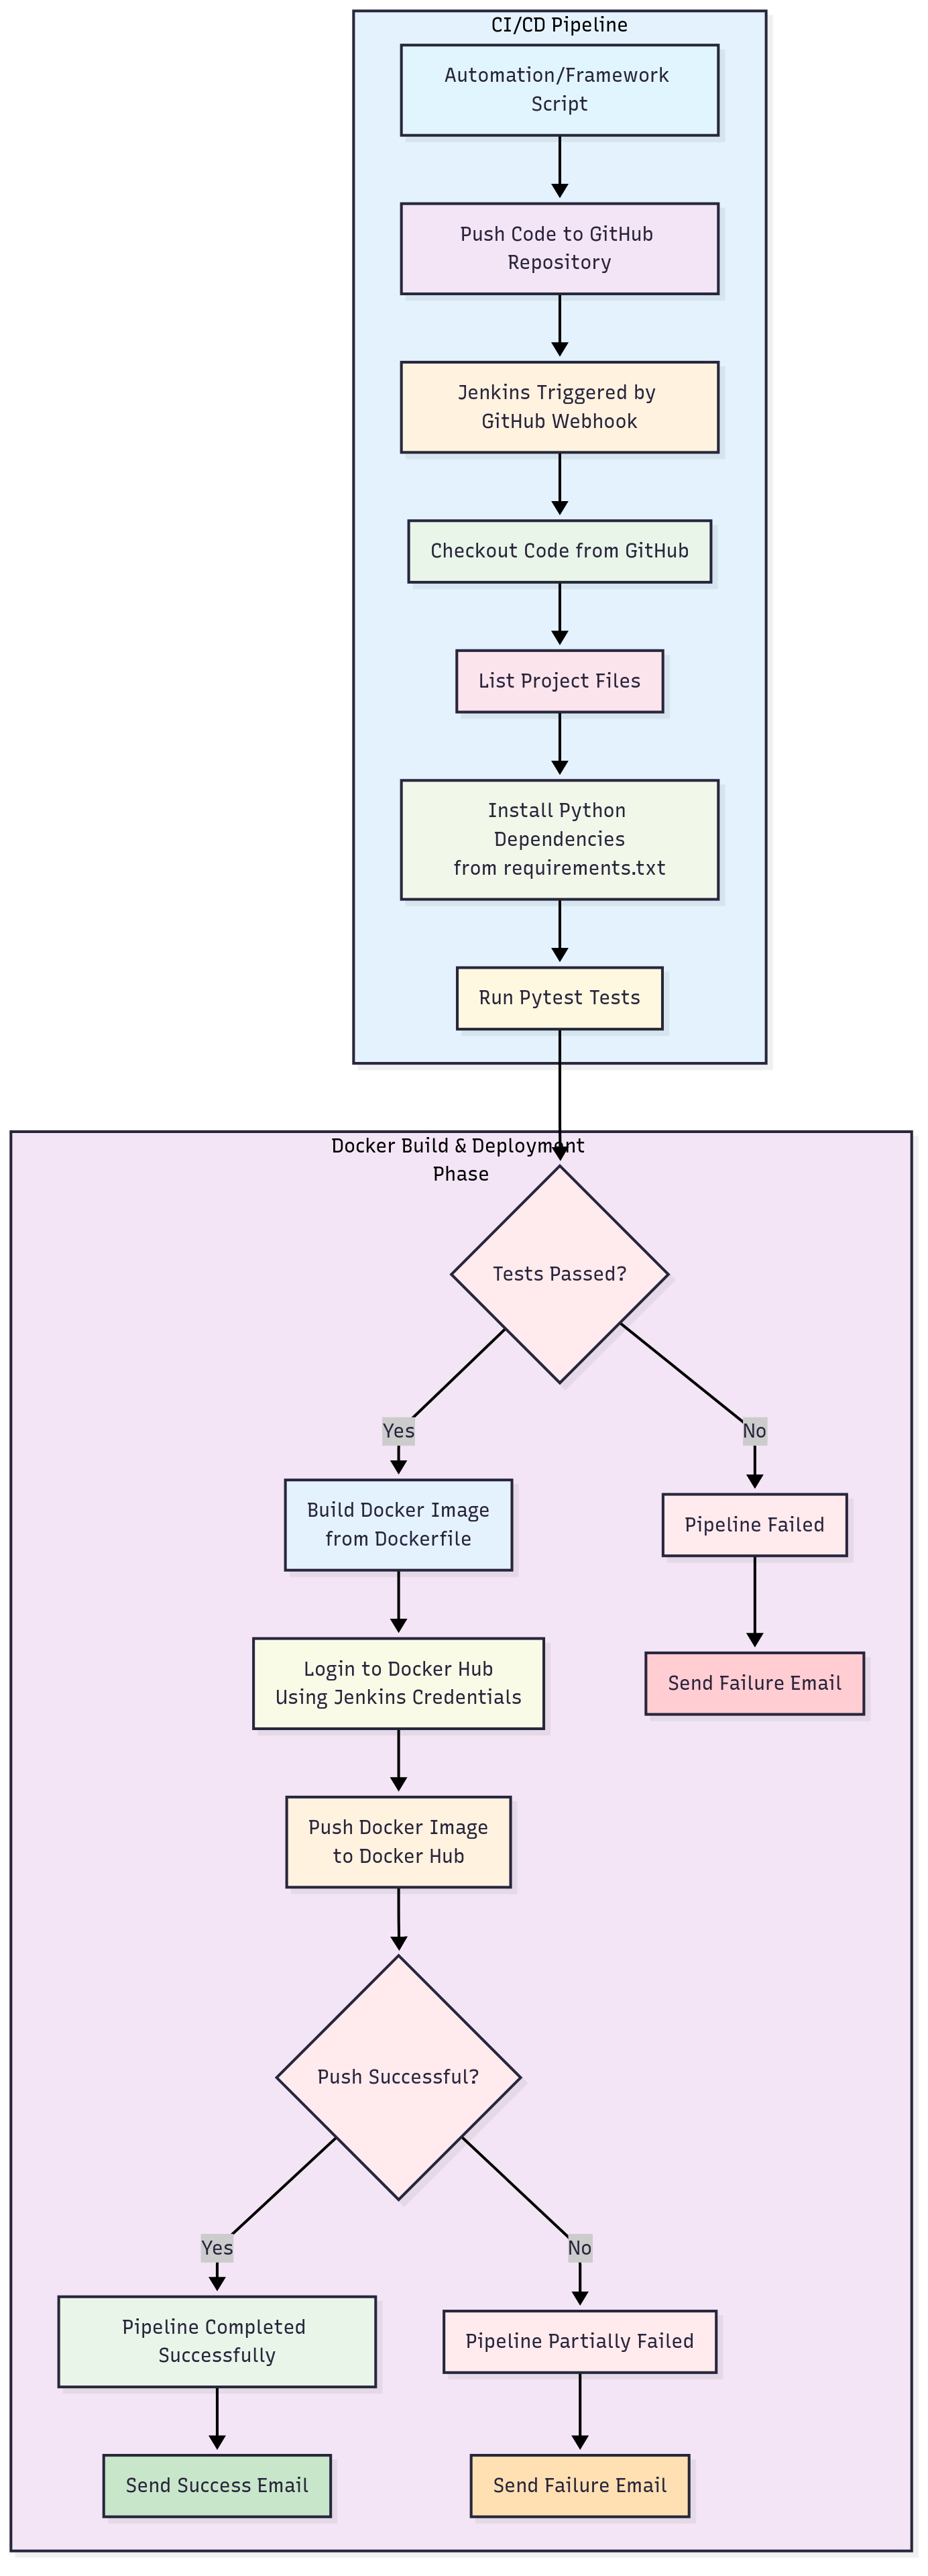
In this guide, we’ll create a Jenkins pipeline that:
- Pulls Python project code from GitHub
- Installs dependencies and runs Pytest tests
- Builds a Docker image of the project
- Pushes the image to Docker Hub
- Sends an email notification for build success or failure
1. Prerequisites
Before starting, ensure you have:
- GitHub account with your Pytest project in a repository
- Jenkins installed and running
- Docker installed on the Jenkins server
- Docker Hub account
- Python and pip installed (for running tests)
- Basic understanding of Git, Docker, and Jenkins pipelines
2. Step 1 – Push Your Project to GitHub
- Create a new GitHub repository (public or private).
- Push your Pytest project code to it:
git init
git remote add origin https://github.com/<your-username>/<your-repo>.git
git add .
git commit -m "Initial commit"
git push origin main
3. Step 2 – Create a Jenkins Pipeline Job
- Open Jenkins Dashboard.
- Click New Item, give a pipeline name, select Pipeline, and click OK.
- Add a description such as:
This pipeline pulls code, runs tests, builds a Docker image, and pushes it to Docker Hub. - Check GitHub Project and paste your GitHub repo URL.
- In Build Triggers, select GitHub hook trigger for GITScm polling.
4. Step 3 – Create a Jenkinsfile
The Jenkinsfile defines your pipeline steps. Place it in the root of your GitHub project so Jenkins can read it automatically.
Example Jenkinsfile:
pipeline {
    agent any

    stages {
        stage('Checkout Code') {
            steps {
                git branch: 'main', url: 'https://github.com/<your-username>/<your-repo>.git'
            }
        }

        stage('List Files') {
            steps {
                bat 'dir' // Use 'ls' for Linux
            }
        }

        stage('Install Dependencies') {
            steps {
                bat 'pip install -r requirements.txt'
            }
        }

        stage('Run Pytest') {
            steps {
                bat 'pytest'
            }
        }

        stage('Build Docker Image') {
            steps {
                script {
                    bat 'docker build -t <dockerhub-username>/<image-name> .'
                }
            }
        }

        stage('Push Docker Image') {
            steps {
                script {
                    withCredentials([string(credentialsId: 'dockerhub-pwd', variable: 'dockerhubpwd')]) {
                        bat """
                        docker login -u <dockerhub-username> -p ${dockerhubpwd}
                        docker push <dockerhub-username>/<image-name>
                        """
                    }
                }
            }
        }
    }

    post {
        success {
            script {
                mail to: 'recipient@example.com',
                     subject: " BUILD SUCCESS: ${env.JOB_NAME} [${env.BUILD_NUMBER}]",
                     body: """
Build Success!

Job: ${env.JOB_NAME}
Build Number: ${env.BUILD_NUMBER}
Status: ${currentBuild.currentResult}

Build URL: ${env.BUILD_URL}
                     """
            }
        }
        failure {
            script {
                mail to: 'recipient@example.com',
                     subject: " BUILD FAILURE: ${env.JOB_NAME} [${env.BUILD_NUMBER}]",
                     body: """
Build Failed!

Job: ${env.JOB_NAME}
Build Number: ${env.BUILD_NUMBER}
Status: ${currentBuild.currentResult}

Check console output: ${env.BUILD_URL}console
                     """
            }
        }
        unstable {
            script {
                mail to: 'recipient@example.com',
                     subject: " BUILD UNSTABLE: ${env.JOB_NAME} [${env.BUILD_NUMBER}]",
                     body: """
Build Unstable!

Some tests may have failed.

Job: ${env.JOB_NAME}
Build Number: ${env.BUILD_NUMBER}

Build URL: ${env.BUILD_URL}
                     """
            }
        }
    }
}
5. Step 4 – Add Docker Hub Credentials to Jenkins
- Go to Jenkins Dashboard → Manage Jenkins → Credentials.
- Select (global) → Add Credentials.
- In Kind, select Secret Text.
- Paste your Docker Hub password in Secret.
- Set ID as
dockerhub-pwd(this matches the Jenkinsfile).
6. Step 5 – Create a Dockerfile
Place a Dockerfile in your project root:
FROM python:3.10

WORKDIR /app

COPY requirements.txt .
RUN pip install -r requirements.txt

COPY . .

CMD ["pytest"]
7. Step 6 – Build and Run the Pipeline
- Commit your Jenkinsfile and Dockerfile to GitHub.
- Open Jenkins, click Build Now on your pipeline.
- Jenkins will:
- Pull the code from GitHub
- List project files
- Install dependencies
- Run Pytest tests
- Build and tag a Docker image
- Push the image to Docker Hub
- Send an email notification with the build result
8. Troubleshooting Common Issues
- DNS issues in Docker – Update network settings to use
8.8.8.8and8.8.4.4as DNS servers. - Permission denied for Docker commands – Ensure Jenkins user is in the
dockergroup. - Docker login failures – Check credentials in Jenkins.
Final Workflow
GitHub Commit → Jenkins Build → Test with Pytest → Docker Image Build → Push to Docker Hub → Email Notification